How to manage your pre-orders during the festive season
Running pre-order menus during the festive period offers several benefits, including streamlined operations, better inventory management, and enhanced customer satisfaction.
By allowing guests to place orders in advance, you can accurately gauge demand, reduce potential food waste, and ensure your team have the necessary stock on hand. This approach also helps alleviate last minute rushes, allowing your staff to focus on providing quality service and creating a more organised dining experience.
Pre-orders can be set up to send to the POS and to the Kitchen in 3 different ways:
Send Time: 4am – 7am
Pre-orders will attempt to send order to the site POS from 4am on the dining date of the booking
Pick Up Time: 23:59
All pre-orders will display on the POS with a pickup time of 23:59
Delayed Order Send time: 5 mins before pickup time
Pre-orders will automatically send to kitchen 5 minutes before pickup time set above (23:54) unless manual intervention has happened. If no manual intervention happens the order will be sent to the kitchen without a table number. This is why we recommend this pickup time being set to 23:59 to prevent orders sending directly to the kitchen without Tables Numbers.
Managing pre-orders on the day of the event
Pre-Arrival
Step 1: Morning Checks
Checking your pre-orders have been sent correctly from the Events
Host platform
Log onto the Host platform and select the Day Diary tab to display all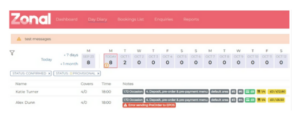 bookings for the day. Any pre-order sending errors will appear in red – in the example it states, “Error sending PreOrder to EPOS”.
To troubleshoot any errors, navigate to the Chef Reports on the Reports tab. Using the date range selector, amend the start and end date to the current day. All pre-orders will display.
In the example on the right, using the Event view of the report, users are presented clearly with the reason for a pre-order not sending.
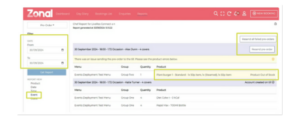
For this example, the error is an item out of stock. To resolve this error, the item will need to be placed back in stock on the POS. Once this is done, select “Resend pre-order” on the Chef Report.
Step 2: Prepare your kitchen team
Ensuring the kitchen team have the Chef Report
Once all errors have been resolved, ensure the kitchen team have a copy of the Chef Report (we recommend using the report stating number of items per event), which can be printed from the Host app. This way they can prepare large orders in advance. Automated emails containing the Chef Report can also trigger emails to desired recipient(s) daily.
Step 3: Check your POS
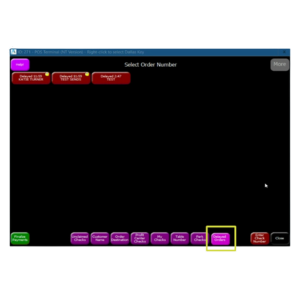
Check the pre-orders on the POS
Once a pre-order reaches the POS, they are stored on the till as delayed orders.
To view the orders, navigate to Pick up Account on the till (often found in Options). This will display all open accounts within the sales area.
Use filtering at the bottom of the screen to display only Delayed Orders. If the venue as multiple sales areas, it is recommended that the Sales Area Account filter is deselected to show all orders across the venue.
Ensure all bookings that have a successful pre-order are displayed. Please note additional orders may display if using delayed ordering for other elements.
Step 4: Prepare your front of house
Ensure your FOH team have either the Chef Report or Run Sheet
Run Sheets are part of a “Central Reservations” feature flag in the system. If you do not see this option within your setup, you may need to speak to your account manager.
To access the Run Sheet, open the booking on the Host platform, scroll towards the bottom and select Generate Run Sheet. Click the desired options and “generate”. Once loaded, print.
Guest Arrival
Now that you are prepared with your morning tasks, it’s time for the guests to arrive. The below steps offer a walkthrough of the recommended steps for handling bookings once guests have arrived at the venue.
Step 1: Seating a booking
Once the booking has arrived and the guests are ready to go to their table, seat the guest on the Host platform.
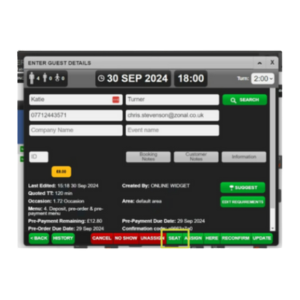
If the booking has a deposit paid, the Redeem Deposit box will display. Use the Seat & Redeem button to add the deposit to the table on the POS (if the option does not display, please speak to your account representative who will be able to enable this feature for you).
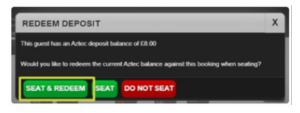
Once completed, the table will be opened on POS with the booking name and deposit applied.
Step 2: Check the Pre-Order with the guests
Once all the guests have arrived and are seated, using the Chef Report or Run Sheet, users are recommended to confirm all pre-ordered items are correct with the guests.
Step 3: Add the Pre-Order to the table on POS
Log on to the till and navigate to delayed orders (found in Pick Up Account usually in Options, use filtering to display delayed orders only).
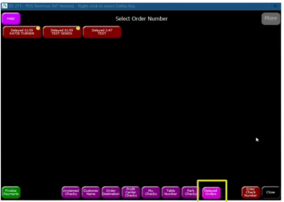
Select the correct delayed order (pre-order).
The order preparation prompt is then displayed asking if you wish to start preparing the order. It is important that you select ‘No’ so that you can assign the pre-order to a table. If yes is selected, this will send the pre-order straight to the kitchen without a table number.
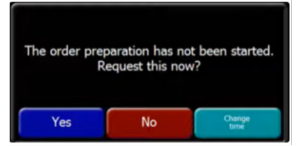
Selecting no will open the order on to the Order Pad.

Add the order to the table where the booking is seated by opening the table plan on the POS and selecting the correct table. In the below example the ‘Tables’ button is selected to open the table plan; this may be worded differently in different estates.

A box will display asking “Do you want to merge Order Number X with Table X?”, select All Items to add all pre-order products to the table. Once added to the table, make any required changes from the checks done in step 2.
On completion, click Save and this will send the finalised order to the kitchen,
We highly recommend that you test this journey, end to end before your busy period hits.
Zonal’s Customer Success team is on hand to carry out a Booking Health Check which is available exclusively for Zonal customers to ensure you are getting the most out of your Zonal technology.

